流体布局
流体布局
在我的另一篇文章《弹性+固宽布局》http://linhui-dragon.iteye.com/admin/blogs/1936267中,我介绍了弹性加最小固定宽度的一种布局方案,现在介绍另一种布局方案---弹性流体布局。
那种方案其实就是这种布局的变通应用。弹性布局最大的优点就是能充分利用屏幕空间。无论客户端分辩率多大,都能自动适应宽度的变化。
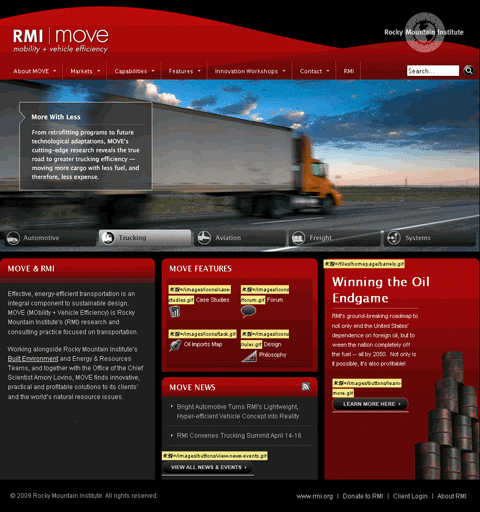
看看上面这幅图片,这是国外的一个网站,它本身是固定宽度布局的,我们的布局就以这幅图为基础来讲解的。当然,我不会全面介绍如何制作这个完整页面,我只针对重点做一下讲解。
其实做一个弹性布局,相对来说是比较简单的,但是这种布局虽简单,可是对于细节上的把握才是这种布局的精髓。弹性布局虽说有这么好的优点,可是却有比较致命的缺陷:
1. 如果不对这种布局设置一个最小宽度,当用户缩小窗口到足够小时,会对布局产生致命的影响。造成严重影响布局错位。
2. 当一个页面弹性布局时,对于里面的图片会产生巨大的影响。因为到目前为至,还没有解决图片随百分比缩放的问题。所以这篇文章对于布局的讲解可能还相对少些,而更多的是解决上面的两个问题,我相信只要解决了上面的两个问题,这种布局相对来说就容易多了。
一、解决最小宽度
一般弹性布局都是利用百分比来设置一个容器的宽度。这样就能自动适应屏幕的宽度了。但是宽度值不能完全由用户自由缩放,我们必须在这个百分比宽度限制其最小宽度,当用户缩小窗口到一定值,就不让窗口再缩放了。
熟悉CSS的朋友都知道,有这样四个属性:
Min-width:最小宽度
Max-width:最大宽度
Min-height:最小高度
Max-height:最大高度
这四个属性刚好能解决这个问题,是不是比较欣喜,可是,别忙,虽说它们能解决这个问题,可是却有一个严重的问题,用户使用最多的浏览器IE6却不支持这几个属性,这是一件非常糟糕的事情。我们总不能丢弃用户最多的浏览器吧!
目前网上比较流行的有四种方法来解决让IE6支持这四种属性:
1. 在CSS中expression来设置最小宽度,比较费内存。
2. 用嵌套DIV,然后用margin偏移模仿实现,多冗余结构。
3. 用JQ框架实现,为一个属性加一个JS框架,有点不划算。
4. 用纯JS代码实现。
前面三种都有劣势,请各自选择最合适的方法,我偏重于最后一种,这是国外的一个牛人实现的,相关例子可以看这儿:
http://www.doxdesk.com/software/js/minmax.html
有了这个JS文件,你只需要在头部调用这个JS文件就可以了。
PS:在演示模型中为了方便,我将这个JS作为内部引用的方式调用,你们在实际应用中将这个JS文件新建为一个JS外部文件,如下方式调用:
<script type="text/javascript" src="minmax.js"></script>

<div id="header"> <div id="inhead"> <p>页头内容</p> </div></div>
#header{height:150px;width:100%;background:#000 url(image/header-bg.png) no-repeat left top;}#inhead{height:150px;width:100%;background:url(image/header-bg.png) no-repeat right bottom;text-align:center;color:#fff;}

<!DOCTYPE html PUBLIC "-//W3C//DTD XHTML 1.0 Transitional//EN" "http://www.w3.org/TR/xhtml1/DTD/xhtml1-transitional.dtd"><html xmlns="http://www.w3.org/1999/xhtml"><head><meta http-equiv="Content-Type" content="text/html; charset=utf-8" /><title>弹性布局设计(冰极峰原创)</title><script type="text/javascript">// JavaScript Document// minmax.js: make IE5+/Win support CSS min/max-width/height// version 1.0, 08-Aug-2003// written by Andrew Clover <and@doxdesk.com>, use freely/*@cc_on@if (@_win32 && @_jscript_version>4)var minmax_elements;minmax_props= new Array( new Array('min-width', 'minWidth'), new Array('max-width', 'maxWidth'), new Array('min-height','minHeight'), new Array('max-height','maxHeight'));// Binding. Called on all new elements. If <body>, initialise; check all// elements for minmax propertiesfunction minmax_bind(el) { var i, em, ms; var st= el.style, cs= el.currentStyle; if (minmax_elements==window.undefined) { // initialise when body element has turned up, but only on IE if (!document.body || !document.body.currentStyle) return; minmax_elements= new Array(); window.attachEvent('onresize', minmax_delayout); // make font size listener em= document.createElement('div'); em.setAttribute('id', 'minmax_em'); em.style.position= 'absolute'; em.style.visibility= 'hidden'; em.style.fontSize= 'xx-large'; em.style.height= '5em'; em.style.top='-5em'; em.style.left= '0'; if (em.style.setExpression) { em.style.setExpression('width', 'minmax_checkFont()'); document.body.insertBefore(em, document.body.firstChild); } } // transform hyphenated properties the browser has not caught to camelCase for (i= minmax_props.length; i-->0;) if (cs[minmax_props[i][0]]) st[minmax_props[i][1]]= cs[minmax_props[i][0]]; // add element with properties to list, store optimal size values for (i= minmax_props.length; i-->0;) { ms= cs[minmax_props[i][1]]; if (ms && ms!='auto' && ms!='none' && ms!='0' && ms!='') { st.minmaxWidth= cs.width; st.minmaxHeight= cs.height; minmax_elements[minmax_elements.length]= el; // will need a layout later minmax_delayout(); break; } }}// check for font size changesvar minmax_fontsize= 0;function minmax_checkFont() { var fs= document.getElementById('minmax_em').offsetHeight; if (minmax_fontsize!=fs && minmax_fontsize!=0) minmax_delayout(); minmax_fontsize= fs; return '5em';}// Layout. Called after window and font size-change. Go through elements we// picked out earlier and set their size to the minimum, maximum and optimum,// choosing whichever is appropriate// Request re-layout at next available momentvar minmax_delaying= false;function minmax_delayout() { if (minmax_delaying) return; minmax_delaying= true; window.setTimeout(minmax_layout, 0);}function minmax_stopdelaying() { minmax_delaying= false;}function minmax_layout() { window.setTimeout(minmax_stopdelaying, 100); var i, el, st, cs, optimal, inrange; for (i= minmax_elements.length; i-->0;) { el= minmax_elements[i]; st= el.style; cs= el.currentStyle; // horizontal size bounding st.width= st.minmaxWidth; optimal= el.offsetWidth; inrange= true; if (inrange && cs.minWidth && cs.minWidth!='0' && cs.minWidth!='auto' && cs.minWidth!='') { st.width= cs.minWidth; inrange= (el.offsetWidth<optimal); } if (inrange && cs.maxWidth && cs.maxWidth!='none' && cs.maxWidth!='auto' && cs.maxWidth!='') { st.width= cs.maxWidth; inrange= (el.offsetWidth>optimal); } if (inrange) st.width= st.minmaxWidth; // vertical size bounding st.height= st.minmaxHeight; optimal= el.offsetHeight; inrange= true; if (inrange && cs.minHeight && cs.minHeight!='0' && cs.minHeight!='auto' && cs.minHeight!='') { st.height= cs.minHeight; inrange= (el.offsetHeight<optimal); } if (inrange && cs.maxHeight && cs.maxHeight!='none' && cs.maxHeight!='auto' && cs.maxHeight!='') { st.height= cs.maxHeight; inrange= (el.offsetHeight>optimal); } if (inrange) st.height= st.minmaxHeight; }}// Scanning. Check document every so often until it has finished loading. Do// nothing until <body> arrives, then call main init. Pass any new elements// found on each scan to be bound var minmax_SCANDELAY= 500;function minmax_scan() { var el; for (var i= 0; i<document.all.length; i++) { el= document.all[i]; if (!el.minmax_bound) { el.minmax_bound= true; minmax_bind(el); } }}var minmax_scanner;function minmax_stop() { window.clearInterval(minmax_scanner); minmax_scan();}minmax_scan();minmax_scanner= window.setInterval(minmax_scan, minmax_SCANDELAY);window.attachEvent('onload', minmax_stop);@end @*/</script><style type="text/css">/*本例中运用到一个永远固定到页脚的footer容器,这个层是独立于主内容区的.*/*{margin:0;padding:0;}a:link,a:visited{color:orange;font-weight:bold;}html, body, #wrapper {height: 100%;font-size:12px;}#wrapper{width:100%;background:#777;min-width:960px;}body > #wrapper {height:auto; min-height:100%;}#main {padding-bottom: 54px;}/* 必须使用和footer相同的高度,最小宽度ie6中加JS解决 */#header{height:148px;width:100%;text-align:center;color:#fff;background:#000 url(http://images.cnblogs.com/cnblogs_com/binyong/tanxin/header-bg.png) no-repeat left top;}#inhead{height:148px;width:100%;text-align:center;color:#fff;background:url(http://www.blueidea.com/articleimg/2009/05/6692/header-bg.png) no-repeat right bottom;}h3{font-size:14px;line-height:90px;}#header p{font-size:12px;line-height:30px;}#footer {position: relative;margin-top: -54px; /* footer高度的负值 */height: 54px;/* footer高度*/width:100%;clear:both;background:#000;text-align:center;color:#fff;min-width:960px;}#footer p{line-height:26px;}#content{background:#999;width:80%;margin:0 auto;height:654px;}#content p{line-height:30px;padding:0 30px;color:#fff;}/*说明: 需要注意的就是#main的padding值、footer的高度和负margin值,需要保持一致。下面是著名的万能float闭合Clearfix Hack*/.clearfix:after {content: ".";display: block;height: 0;clear: both;visibility: hidden;}.clearfix {display: inline-block;}/* Hides from IE-mac \*/* html .clearfix { height: 1%;}.clearfix {display: block;}/* End hide from IE-mac */</style></head><body><div id="wrapper"> <div id="main" class="clearfix"> <div id="header"> <div id="inhead"> <h3>弹性流体布局</h3> <p>页头背景可平铺整个浏览器宽度,而正文内容则始终居中显示,不管分辩率是多大。</p> </div> </div> <div id="content"> <p>本页面演示了两个比较重要的技巧:最小宽度值和弹性图片.</p> <p>弹性布局是用到min-width这个属性,但这个属性在IE6下不受支持,因此加入了老外的一个JS脚本,这个脚本让IE6也能支持最小,最大宽度(高度)四个属性.</p> <p> </p> <p>弹性布局其实最难的还不是布局,而是里面的图片如何做到自适应,也就是说让图片也变得弹性起来。这是这种布局时要最优先考虑的事情。</p> <p>页头图片就是一个弹性图片的典型应用,你可以缩小一下窗口看看。</p> <p>相关文章链接:《<a href="http://www.cnblogs.com/binyong/archive/2009/05/07/1451319.html">弹性+固宽布局</a>》</p> </div> </div></div><div id="footer"> <p>我是浮动的始终固定在底部的DIV,无论中间的文字内容高度是否不够一屏,我还是能居底显示,</p> <p>当中间内容超过一屏时,我又可以向下浮动哟</p></div></body></html>