用Spring创建的JavaBean发布成WebService
1、首先,看看这个简单的类代码:
package com.hoo.service;/** * <b>function:</b>Spring的装载Bean的Service * @author hoojo * @createDate 2011-3-9 下午06:30:26 * @file SpringService.java * @package com.hoo.service * @project Axis2WebService * @blog http://blog.csdn.net/IBM_hoojo * @email hoojo_@126.com * @version 1.0 */public class SpringService {private String name;private int number;public void setName(String name) {this.name = name;}public void setNumber(int number) {this.number = number;}public String getMessage() {return this.number + "#" + this.name;}}
将这个类编译后的class,放到[tomcat-home]\webapps\axis2\WEB-INF\classes中,注意带上package类路径的目录。
2、在<Tomcat安装目录>\webapps\axis2\WEB-INF\web.xml文件中加入下面的内容:
<listener> <listener-class>org.springframework.web.context.ContextLoaderListener</listener-class></listener><context-param> <param-name>contextConfigLocation</param-name> <param-value>classpath*:applicationContext.xml</param-value></context-param>
这段配置会Spring的朋友肯定知道,这个是加载spring容器和设置spring的配置文件的。
3、在[tomcat-home]\webapps\axis2\WEB-INF\classes中新建一个applicationContext.xml文件,文件中的内容如下:
<?xml version="1.0" encoding="UTF-8"?><beans xmlns="http://www.springframework.org/schema/beans"xmlns:xsi="http://www.w3.org/2001/XMLSchema-instance"xsi:schemaLocation="http://www.springframework.org/schema/beans http://www.springframework.org/schema/beans/spring-beans-2.5.xsd"><bean id="SpringBeanService" class="com.hoo.service.SpringService"><property name="name" value="hoojo"/><property name="number" value="1"/></bean></beans>
上面配置了SpringService,利用Spring的容器帮我们设置name、number这2个属性的值。
1、 在tomcat-home\webapps\axis2\WEB-INF\lib目录中有一个axis2-spring-1.5.3.jar文件,该文件用于将被装配JavaBean的发布成WebService。同样这里我们采用手动打包发布的模式,在C盘建立一个axis2-spring-ws的目录,然后在此目录中新建一个META-INF的目录,目录中添加一个services.xml文件,内容如下:
<service name="springService"> <description> Spring aware </description> <parameter name="ServiceObjectSupplier"> org.apache.axis2.extensions.spring.receivers.SpringServletContextObjectSupplier </parameter> <!-- 这里的值和Spring的applicationContext中配置的bean的id对应,就是通过在spring的容器获取注入的bean --> <parameter name="SpringBeanName"> SpringBeanService </parameter> <messageReceivers> <messageReceiver mep="http://www.w3.org/2004/08/wsdl/in-out" class="org.apache.axis2.rpc.receivers.RPCMessageReceiver" /> </messageReceivers></service>
在文件中需要通过ServiceObjectSupplier参数指定SpringServletContextObjectSupplier类来获得Spring的ApplicationContext对象;
然后用jar命令创建aar文件
![]()
然后将生产的aar文件,复制到[tomcat_home]\webapps\axis2\WEB-INF\services目录中
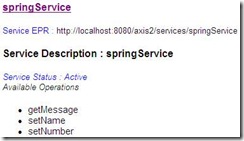
2、 然后重启tomcat,访问:
http://localhost:8080/axis2/services/listServices
就可以看到刚才发布的springService了

3、 编写客户端测试代码
package com.hoo.service;import javax.xml.namespace.QName;import org.apache.axis2.AxisFault;import org.apache.axis2.addressing.EndpointReference;import org.apache.axis2.client.Options;import org.apache.axis2.rpc.client.RPCServiceClient;/** * <b>function:</b>SpringService客户端代码 * @author hoojo * @createDate 2011-3-14 上午14:21:59 * @file LoginServiceClient.java * @package com.hoo.service * @project Axis2WebService * @blog http://blog.csdn.net/IBM_hoojo * @email hoojo_@126.com * @version 1.0 */public class SpringServiceClient {public static void main(String[] args) throws AxisFault {String target = "http://localhost:8080/axis2/services/springService";RPCServiceClient client = new RPCServiceClient();Options options = client.getOptions();options.setManageSession(true);EndpointReference epr = new EndpointReference(target);options.setTo(epr);QName qname = new QName("http://service.hoo.com", "getMessage");Object[] result = client.invokeBlocking(qname, new Object[] { null }, new Class[] { String.class });System.out.println(result[0]);}}
运行后,看到bean注入的值有输出。
1#hoojo