Windows下Svn的安装使用
1.svn分为服务器(Tigris svn【Setup-Subversion-1.6.5.msi】)和客户端(Tortoise svn【TortoiseSVN-1.6.6.17493-win32-svn-1.6.6.msi】乌龟)
2.分别安装
3.安装完服务器端软件后,新开一个cmd窗口,建立Responsitory(存储仓库) ?切换到指定的文件夹(首先新建一个目录,D:\share,然后命令行切换到该目录下)?输入命令:svnadmin create svnrepo(目录名,目录名随意,建立后不要修改里面的文件)
4.建立用户?找到Responsitory的目录(这里为D:\share),切换到conf目录?用编辑软件打开svnserve.conf文件?找到# password-db = passwd 这样一行,去掉注释”#” ?编辑 passwd文件?增加svn用户,在最后一行添加username=password键值对形式的用户。
5.启动服务器?在cmd窗口中键入命令svnserve –d –r svnrepo【注意不要关闭命令行窗口,关闭窗口会把 svnserve 停止。】
6.采用把 svnserve 注册成 windows service
a)正确的命令为:
i.注册为windows服务
cmd窗口中键入命令:sc create svnserve binPath=<空格>"svnserve --service --root C:\svntest" start= <空格>auto depend=<空格>"tcpip" DisplayName= <空格>"svn服务"
ii.删除服务
sc delete svnserve
b)例如:sc create svn binPath= ""C:\Program Files\Subversion\bin\svnserve.exe" --service -r D:\share\svnrepo" DisplayName= " svn服务" depend= “Tcpip” start= auto
c)注意的地方
- 如果你的svnserve的path中有空格,那么用 " 是必须的
- --service 也是必须的
- "-r D:\share\svnrepo " 定义的是你的repository的根目录,也就是包含了”conf“、”dav“、”hooks“等目录的那个目录
7.svn运行方式:
a)Svnserve(此文档为该模式)
b)Apache http
8.客户端访问?svn://localhost 访问struts?http://svn.apache.org/repos/asf/struts/
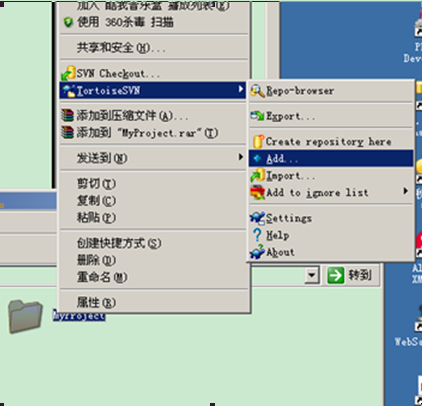
9.先直接在本地创建一个文件夹,然后从仓库中checkout下来空项目?在文件夹中建立项目?选中项目右键添加到仓库中  ?继续右键commit
10.eclipse+svn:
a)subclipse(subversion plugin)?到tigris网站? http://subclipse.tigris.org/ 查找插件url? http://subclipse.tigris.org/update_1.6.x
b)下载zip文件
11.建项目入库 update 下载到自己的workspace 自己修改,提交
a)打开svn视图?新建?资源库位置svn://localhost
b)Eclipse中新建项目?右键?Share Project?select svn?…..
c)选中项目右键提交
12.其他成员使用:
a)打开svn视图à新建à资源库位置svn://localhost
b)选中仓库中的项目?检出为?filish