android模仿iphone气泡聊天 气泡大小自适应
这两天在做一个电子商城的商品评论功能,想到模仿微信或者iphone中的气泡聊天方式,气泡聊天是iphone内置的控件,不对开发者开放,android中更是没有提供类似的控件。于是先在百度google上搜了一下有没有类似的android实现方式,这样的帖子不多,也就局限于百度的第一页,以下面这个帖子为代表:http://blog.csdn.net/randyjiawenjie/article/details/6678738
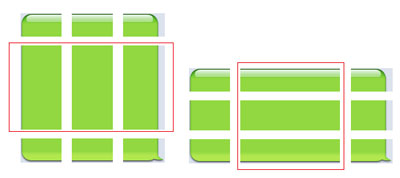
大致的实现方法是使用“ListView+自定义adapter+气泡背景图片”,其他的帖子也是类似,而自己想实现的效果要求气泡的大小能够“自适应聊天(短信)内容”,固定的背景图片显然不能实现这个要求。再次寻寻觅觅,找到下面这个英文帖子:http://mobiforge.com/developing/story/sms-bubble-ui-iphone-apps,大致讲解了在ios中模仿iphoe气泡的思路,其中关键是将气泡图片切割成9个栅格,如下图:
假设将图片的9个栅格区域按逆时针方向编号,中间内容部分编号为9,使用ReleativeLayout+ImageView将9张图片依次逐行排列,注意图片切割时水平方向高度和垂直方向高度要一致,布局文件如下:
?
<?xml version="1.0" encoding="utf-8"?><RelativeLayout xmlns:android="http://schemas.android.com/apk/res/android" android:layout_width="fill_parent" android:layout_height="fill_parent" android:gravity="right" > <RelativeLayout android:id="@+id/bubble_lay_1" android:layout_width="wrap_content" android:layout_height="wrap_content" > <ImageView android:id="@+id/right_1" android:background="@drawable/right_1" android:layout_width="wrap_content" android:layout_height="wrap_content" /> <ImageView android:id="@+id/right_8" android:background="@drawable/right_8" android:layout_width="fill_parent" android:layout_height="wrap_content" android:layout_toRightOf="@id/right_1" /> <ImageView android:id="@+id/right_7" android:background="@drawable/right_7" android:layout_width="wrap_content" android:layout_height="wrap_content" android:layout_toRightOf="@id/right_8" /> </RelativeLayout> <RelativeLayout android:id="@+id/bubble_lay_2" android:layout_width="wrap_content" android:layout_height="wrap_content" android:layout_below="@id/bubble_lay_1" > <ImageView android:id="@+id/right_2" android:background="@drawable/right_2" android:layout_width="wrap_content" android:layout_height="100dp" /> <TextView android:id="@+id/right_9" android:background="@drawable/right_9" android:textColor="#000000" android:layout_width="wrap_content" android:layout_height="wrap_content" android:layout_toRightOf="@id/right_2" /> <ImageView android:id="@+id/right_6" android:background="@drawable/right_6" android:layout_width="wrap_content" android:layout_height="100dp" android:layout_toRightOf="@id/right_9" /> </RelativeLayout> <RelativeLayout android:id="@+id/bubble_lay_3" android:layout_width="wrap_content" android:layout_height="wrap_content" android:layout_below="@id/bubble_lay_2" > <ImageView android:id="@+id/right_3" android:background="@drawable/right_3" android:layout_width="wrap_content" android:layout_height="wrap_content" /> <ImageView android:id="@+id/right_4" android:background="@drawable/right_4" android:layout_width="fill_parent" android:layout_height="wrap_content" android:layout_toRightOf="@id/right_3" /> <ImageView android:id="@+id/right_5" android:background="@drawable/right_5" android:layout_width="wrap_content" android:layout_height="wrap_content" android:layout_toRightOf="@id/right_4" /> </RelativeLayout></RelativeLayout>
?
中间的TextView表示聊天内容部分,截取气泡图片9号栅格中的图片作为其背景,接着在代码中根据聊天内容调整2/6号,4/8号,9号的长宽,代码如下:
?
转载请标明来自:南通吃喜酒婚庆网
?
public class TestActivity extends Activity { private int textSize = 16;//聊天内容字体大小 private String text ="heh你好呀he";//聊天内容 private int bubbleMaxWidth = 100;//气泡的最大宽度 @Override public void onCreate(Bundle savedInstanceState) { super.onCreate(savedInstanceState); setContentView(R.layout.main); this.right(); } private void right(){ TextView t = (TextView)findViewById(R.id.right_9);//聊天内容TextView ImageView img2 = (ImageView)findViewById(R.id.right_2); ImageView img6 = (ImageView)findViewById(R.id.right_6); ImageView img4 = (ImageView)findViewById(R.id.right_4); ImageView img8 = (ImageView)findViewById(R.id.right_8); t.setTextSize(textSize); t.setText(text); //获得聊天内容在屏幕上的宽度,4/8号的宽度等于聊天内容的宽度 TextPaint paint = t.getPaint(); int width = (int)(paint.measureText(text)); int height = textSize*2;//聊天内容只占一行的情况下,2/6/9号的宽度等于字号的两倍 //如果聊天内容的宽度大于气泡的最大宽度,则让它换行 if(width>=bubbleMaxWidth){ height = textSize*2*((int)(width/100)+1);//换行则调整2/6/9号的宽度 width = bubbleMaxWidth; t.getLayoutParams().width=width; } img2.getLayoutParams().height=height; img6.getLayoutParams().height=height; t.getLayoutParams().height=height; img4.getLayoutParams().width=width; img8.getLayoutParams().width=width; }?
剩下的则是,自定义adapter了,代码如下:
public class ShareCommentAdapter extends BaseAdapter { private Activity context; private List<ShareComment> commentList; private int textSize = 16; private int bubbleMaxWidth; public ShareCommentAdapter (Activity context,List<ShareComment> commentList){ Display display = context.getWindowManager().getDefaultDisplay(); bubbleMaxWidth = (int)(display.getWidth()*0.6); this.context = context; this.commentList = commentList; } @Override public int getCount() { return commentList.size(); } @Override public Object getItem(int position) { return commentList.get(position); } @Override public long getItemId(int position) { return position; } @Override public View getView(int position, View convertView, ViewGroup parent) { // TODO Auto-generated method stub LayoutInflater mInflater = LayoutInflater.from(context); View view = null; ShareComment comment = commentList.get(position); if(comment.getIsHost()==1){ view = mInflater.inflate(R.layout.share_comment_right_item, null); this.setRightBubbleStyle(view, comment.getComment()); }else{ view = mInflater.inflate(R.layout.share_comment_left_item, null); this.setLeftBubbleStyle(view, comment.getComment()); } //ViewGroup.LayoutParams params = new LayoutParams(100,100); //view.setLayoutParams(params); return view; }?
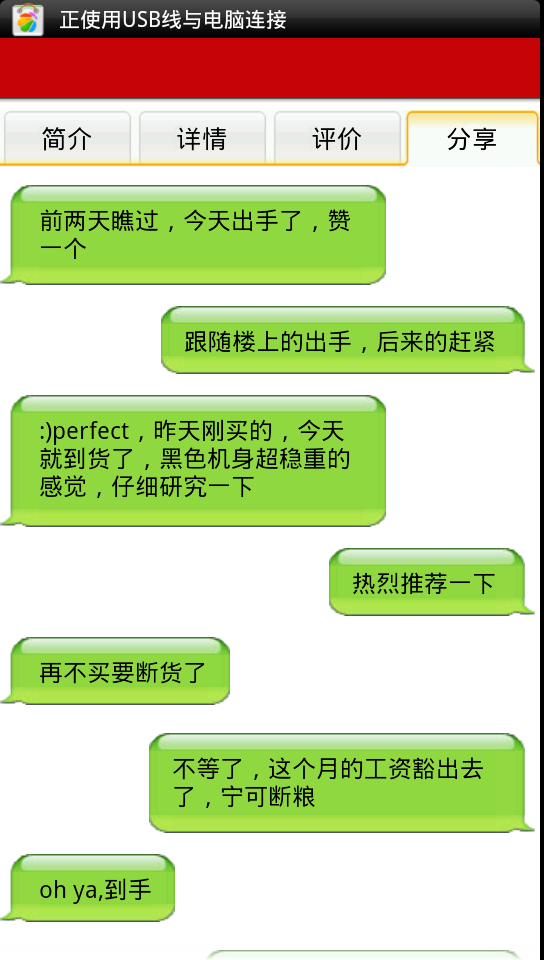
其中setLeftBubbleStyle(view, comment.getComment())就是上上面设置气泡样式的right()方法的内容,最终效果如下:
感兴趣的可以去我的网站下载源代码,源代码包含左右两个方向的气泡,其中左边的已经注释掉了,下载地址:源码
?
?
1 楼 yangjiantong 2012-06-18 为什么不直接用.9图片做背景呢?